Choosing whether to replace your cabinets or refinish them is a crucial decision that impacts your kitchen’s timeline. Refinishing is the less-expensive option that provides a fresh look and fewer disruptions to your home life.
San Jose Cabinet Refinishing also reduces waste, as it keeps existing quality hardwood in use rather than discarding it. This is a more environmentally conscious approach than replacing cabinets, which creates more landfill waste.
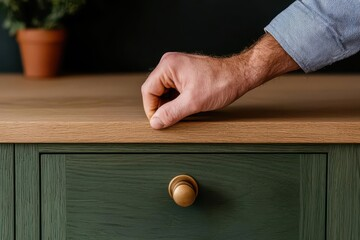
Phase 1: Preparation
Cabinet refinishing gives homeowners the opportunity to transform their kitchens with new colors, finishes, or details like crown molding without starting from scratch. Refinishing is a more environmentally-friendly option than replacement because it preserves quality hardwood and reduces waste, as well as the energy and natural resources needed to manufacture, transport, and install new cabinets.
During the cabinet refinishing process, contractors work to thoroughly clean and prep surfaces before applying a new finish. This includes removing old coatings, repairing minor damage and seams, sanding to create adhesion, and cleaning up dust and debris.
This step can take several days, especially if there are raised trim or carvings that require hand-sanding to smooth out. During this time, it’s important to protect nearby furniture and countertops from dust and debris, which can be messy and difficult to clean up once the project is complete.
Once the surface has been cleaned and sanded, it’s ready for the application of a bonding primer. This is a critical step that helps the paint adhere to the surface and prevent peeling. It’s important to use a primer designed for cabinetry, as a generic product may not provide the best results.
A high-quality refinishing company will use low VOC (volatile organic compound) systems that are safe for families and pets. These finishes are also water and heat resistant, which makes them a smart choice for bathrooms and kitchens. Cabinet refinishers use spray equipment to minimize dust in sensitive areas.
Cabinets can be refinished in any color or stain, so it’s easy to create a custom look. Whether you want to go lighter and brighter, or bolder and richer, refinishing is the best way to achieve your desired style.
Refacing and refinishing are two of the most popular ways to refresh your home’s cabinetry. Both offer a variety of design options, but refacing offers additional opportunities to redefine your kitchen’s appearance and functionality, such as by adding soft-close drawers or glass panel doors. Understanding what you can expect from these transformative processes can help you plan for your renovation and prepare for the time commitment involved.
Phase 2: Staining
Cabinet refinishing allows you to personalize your kitchen with a new color or stain without the high price tag of replacement. This allows you to keep your budget for additional upgrades like a hardwood floor or stylish backsplash while creating a dramatic change that will impress guests and buyers. Refinishing also helps reduce waste since preserving your existing cabinets means you aren’t throwing away quality wood, as you would with a cabinet replacement project.
The first step in the refinishing process is to remove your cabinets from their hinges so they can be sanded down and prepped for the final finish. Professionals use a mechanical sander to ensure all traces of previous finishes are removed from the cabinets and provide you with a clean, smooth surface. To prevent sanding dust from flying into your eyes or mouth, professionals use masks and protective glasses to avoid any health hazards.
Once the cabinets are sanded down, professionals can apply your desired finish. Most refinishers will offer stain and paint options to suit your style and preference. If you choose a stain, the color can be lightened or darkened to create your perfect shade. In addition, a transparent glaze can be applied over the stain for added durability and shine.
Choosing a high-quality oil-based stain will help your cabinets resist stains and scratches, so they look better for longer. In contrast, a water-based latex coating can easily chip and fade, leaving your cabinets looking dull and outdated.
When you are refinishing your cabinets, it is important to find a company with experience and a strong reputation in the industry. This will help you feel confident that the results of your project will exceed your expectations. A reputable company will take the time to answer any questions you have and provide an accurate estimate for the project before work begins.
The amount of time it takes to complete a cabinet refinishing project will depend on the extent to which you require customization and the availability of materials. The team at Redo Cabinets is committed to delivering exceptional results and offers a flexible schedule that will accommodate your family’s needs.
Phase 3: Painting
Cabinet painting can be a tricky process, but the result is a beautifully refreshed kitchen or bath. During this stage, cabinets are painted with a sprayed enamel or urethane coating to restore their appearance and provide a furniture grade finish. During this phase, the team will apply multiple coats of paint to achieve the desired color and sheen, with proper curing time between each coat.
This is a great opportunity to further personalize your space, from choosing a bolder hue or opting for a two-toned look to incorporating elegant details like crown molding and glass panel doors. Refinishing also offers you a more cost-effective way to refresh your kitchen than fully replacing it. Plus, refinishing preserves the existing hardwood, while replacing means wasting quality materials and contributing to landfill waste.
Before the paint is applied, the team will take a final walkthrough to ensure everything looks as expected. If there are any unforeseen issues that arise, the team will work with you to resolve them as quickly and smoothly as possible without compromising the quality of your project.
Depending on your paint type (oil or water-based), your cabinets may require additional coats to achieve the desired results. In addition, oil-based paints require a longer curing time before they’re ready for use, while water-based paints dry much quicker. It’s important to plan accordingly and avoid scheduling your project during any busy periods in your home to minimize disruptions and ensure a successful outcome.
As a leading provider of cabinet refacing and refinishing services in Metro Detroit, we’ve helped many homeowners transform their spaces with this simple yet effective upgrade. Our experts are here to help you understand the duration of your cabinet refacing or refinishing project so that you can better prepare for the process and minimize any inconvenience or disruption to your daily life.
Phase 4: Finishing Touches
Refinishing or refacing cabinets is a transformative way to breathe new life into your kitchen without the cost and hassle of a full remodel. These projects require a combination of expertise, precision, and time management to achieve the desired results. Understanding the factors that can influence cabinet refinishing or refacing timelines can help you plan ahead and minimize disruptions to your daily routine.
Before any work can begin, it’s important to create a budget and timeline for the project. This will help ensure that the process runs smoothly and that you’re not surprised by any unexpected costs or delays. It’s also important to consider the weather and other factors that may impact your project. For example, cold weather can cause wood and paint to dry unevenly, while high temperatures can lead to bubbles or drips.
The first step in the refinishing process is to remove all hardware and thoroughly clean the surfaces. This step is crucial, as it will prepare the surface for the new finish and eliminate any dirt or grease that has accumulated. Using the right cleaning solution and sandpaper for each surface will help ensure that the surface is smooth and ready for painting or staining. This is also a good opportunity to make any necessary repairs or alterations, like replacing worn or damaged hinges or handles.
After sanding, it’s important to apply a primer before applying the final coat of paint or stain. The primer will help the paint adhere to the surface and block any stains or natural wood grain from showing through. Use a quality oil-based or water-based primer for best results. It’s recommended to wear a mask to protect yourself from fumes during this phase.
Once the primer is fully dry, it’s time to start the painting process. Depending on the type of paint or stain used, this step can take several hours to complete. It’s important to follow the manufacturer’s instructions for proper application and allow adequate drying time between coats. It’s also a good idea to use a high-quality spray painter or brush for best results.